This tutorial walkthrough how to use VSCode IDE configure the workspace setting for nextjs / react project.
Download
Preferences
VS editor provides 2 type of settings, user and workspace. To apply setting to all projects you can configure via User settings. To apply specific setting on particular project choose Workspace settings. Read more on setting here.
Workspace
To develop a Javascript project, I’ll choose to configure common setting in workspace. From Code > Preference > Setting or mac using command + ,
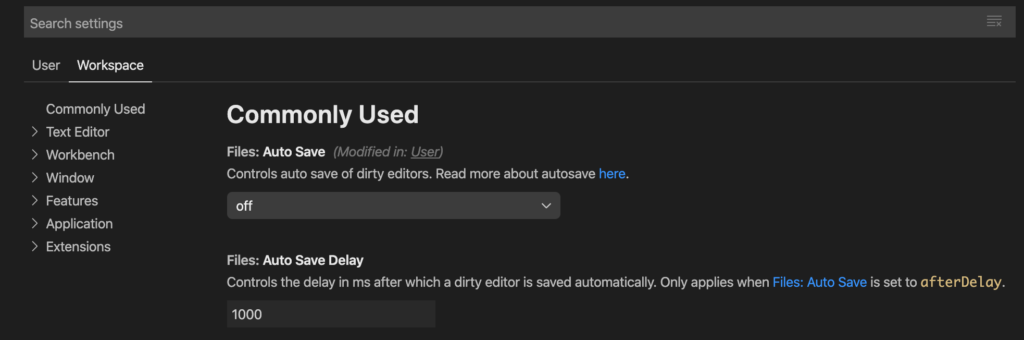
You may see some of the tutorial ask you to changed with the following configuration. You can search by the keywords on the search bar, or click on the left menu.
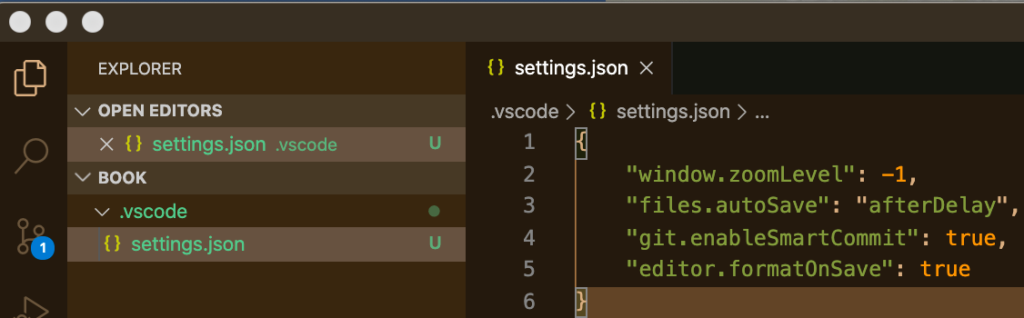
{
  "window.zoomLevel": -1,
  "files.autoSave": "afterDelay",
  "git.enableSmartCommit": true,
  "editor.formatOnSave": true,
}
Once it’s finish, you’ll see a setting.json file is created in your project .vscode folder.
ESLint & Prettier
ESLint helps us to monitor stylistic errors and highlight the broken rules and Prettier help us auto-format code. Regardless Javascript or Typescript project you can use ESLint + Prettier.
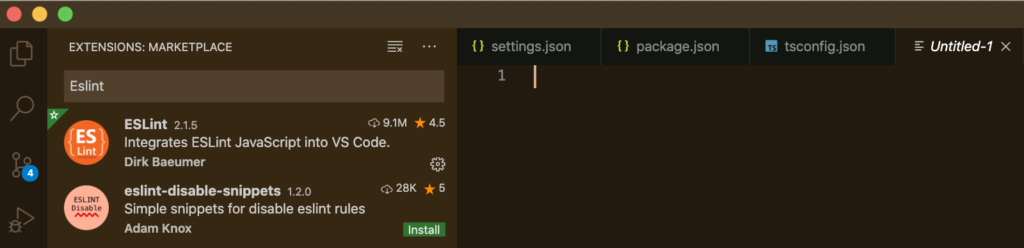
Install plugin
In macOs, Command + Shift + X and search for the Eslint by Dirk Baeumer
Now, we need to start configure the Eslint, you can choose use the UI mode to configure but some setting is not available in UI mode. From the VSCode workspace configuration [.vscode/setting.json] add the following setting directly to the setting.json
Note!! Some setting is deprecated such as “eslint.autoFixOnSave”, it’s replace by “editor.codeActionsOnSave”
{
    "window.zoomLevel": 0,
    "files.autoSave": "afterDelay",
    "git.enableSmartCommit": true,
    "editor.formatOnSave": true,
    "editor.defaultFormatter": "dbaeumer.vscode-eslint",
    "eslint.enable": true,
    "eslint.alwaysShowStatus": true,
    "eslint.validate": [
        "javascript",
        "typescript",
        "typescriptreact",
        "javascriptreact"
    ],
    "eslint.workingDirectories": [
        { "directory": "./*", "changeProcessCWD": true },
        { "directory": "./pages", "changeProcessCWD": true }
    ],
    "eslint.format.enable": true,
    "editor.codeActionsOnSave": {
        "source.fixAll.eslint": true
    },
    "eslint.packageManager": "yarn",
    "eslint.onIgnoredFiles": "warn"
}
ESLint Rules
Create eslintrc.js in your project source root folder with the following content. Read more options here.
module.exports = {
    parser: "@typescript-eslint/parser",
    extends: [
      "plugin:@typescript-eslint/recommended",
      "plugin:@typescript-eslint/eslint-recommended",
      "prettier"
    ],
    env: {
      "es6": true,
      "node": true
    },
    rules: {
      "prettier/prettier": [
        "error",
        {
          "singleQuote": true,
          "trailingComma": "all",
          "arrowParens": "always",
          "printWidth": 100,
          "semi": true
        }
      ],
      "@typescript-eslint/no-unused-vars": "off",
      "@typescript-eslint/explicit-function-return-type": "off",
      "@typescript-eslint/camelcase": "off",
      "react/no-unescaped-entities": "off",
      "@typescript-eslint/no-non-null-assertion": "off",
   },
    plugins: [
      "prettier","@typescript-eslint","react"
    ]
}
ESLint configuration requires dependencies install by yarn command. Such as:
- @typescript-eslint/eslint-plugin
- @typescript-eslint/parser
- eslint
- eslint-config-prettier
- eslint-plugin-prettier
- prettier
ESLint is integrated with Prettier via plugin. You can add the script in your package.json to highlight and auto-fixes broken rules.
"scripts": {
    // other setting
    "lint": "eslint . --ext .ts,.tsx --fix"
},
Themes Mode
You can configure the theme mode, for instance to configure high contrast mode, press command K + command T and select your prefer mode.
TypeScript
Some project will have conflict or overlap configuration, for instance compilerOptions. Read more tsconfig.json here. This is a typical example for the NextJs project configuration.
{
  "compileOnSave": false,
  "compilerOptions": {
    "target": "esnext",
    "module": "esnext",
    "jsx": "preserve",
    "allowJs": true,
    "alwaysStrict": true,
    "moduleResolution": "node",
    "allowSyntheticDefaultImports": true,
    "noUnusedLocals": true,
    "noUnusedParameters": true,
    "removeComments": false,
    "preserveConstEnums": true,
    "sourceMap": true,
    "skipLibCheck": true,
    "baseUrl": ".",
    "typeRoots": ["./node_modules/@types"],
    "lib": ["dom", "es2017"],
    "strict": false,
    "forceConsistentCasingInFileNames": true,
    "noEmit": true,
    "esModuleInterop": true,
    "resolveJsonModule": true,
    "isolatedModules": true
  },
  "include": [
    "next-env.d.ts",
    "./**/*.tsx",
    "./**/*.ts"
  ],
  "exclude": [
    "dist",
    "production-server",
    ".next",
    "out",
    "next.config.js",
    "node_modules"
  ]
}
How do I exclude the .next cache folder from my VS Code Search? I have tried setting exclude folder names in Settings > Search > Exclude. I added the pattern **/.next but it still shows files from that folder in my search.
I’ve assume you’re using macOS. From your vscode > Code > Preference > Setting. From the Search setting bar, type “search.exclude” then only add “**/.next”
Greate article. Keep writing such kind of info on your blog. Winonah Desi Wolff